
LATEST NEWS:
Pro-Series Updates Now Standard on ALL Vector Grill Orders!
A: Yes, it will need to be disassembled prior to painting though. We have a video guide that outlines the process that you can watch HERE
A: The openings of the Vector grill are smaller than the original openings, if the hood lock is in a place where a smaller opening will affect it then no.
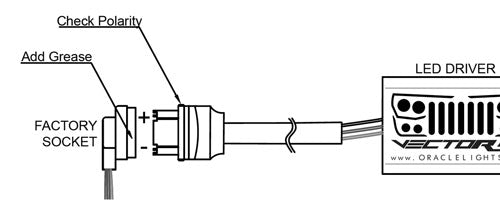
A: Dielectric grease keeps moisture out of electrical connections. This is very important for off-road vehicles such as Wranglers. Can be applied to any electrical connection but should be used especially during Step #9 and Step #10 in the installation guide.
NEW! Watch the video HERE
A1: The DRL is switched on and off by the vehicles "parking lights", to tun on the parking lights.

A2: If the DRL does not turn on when the switch is set to "parking lights" (or if one side only comes on) then the plug needs to be reversed. The plug for the DRL can be plugged in 2 ways but the DRL driver has "polarity" which means it will not come on if that polarity is reversed. Simply unplug, turn 180° and plug back into the socket.
A: Yes, in order to be compliant with DOT regulations the DRL needs to adjust to 50% brightness when the headlights are activated. This is by design and totally normal.
A: Condensation does not necessarily suggest a defect in the product. Like your factory headlights, each light module in the Vector Grill has a small vent to allow moisture to escape. When washing your Jeep pay special attention not to spray high-pressure water directly at the back of the lights through the wheel arch. This could force water into the vent hole and case some condensation. This can usually be corrected easily by parking the Jeep facing the sun for a few hours and letting the moisture dissipate.
A: Water entering the driver or the driver connection will cause the DRL to act erratic (like static on a TV) or the Turn Signal to stay on dimly lit when off. This is signs of current finding the path of least resistance. Good news is it will not cause any permanent damage as long as it is addressed. Blow out the connector with compressed air and add grease to the metal contacts and reconnect the driver.
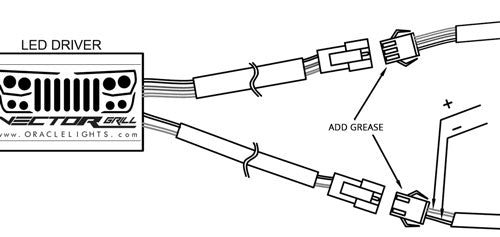
A: This is the LED driver for the DRL and Turn Signal Components, the LED Driver controls the DRL and Turn Signal function. This is a Constant Current LED driver that protects the LEDs from current irregularities and voltage spikes that could potentially damage the LEDs. The driver also has a contains the program for the startup sequence as well as the DRL dimmer function. When connecting the LED driver be sure to check polarity, if plug is reversed the driver will not function properly.
A1: If the flashing is not present with the headlights ON and the engine OFF but begins flashing with the engine turned ON then this is likely a "can-bus" flicker. This is (basically) the vehicle detecting that the headlights have changed (to LED) and are running a diagnostics to see what is going on. This can be corrected by installing the "anti-flicker" or "can-bus" adapters to resolve this issue.
A2: If the lights flicker when (as an example) you go over a bump then this may be a loose connection. The Vector headlight harness connects to the factory H13 headlight socket, check that the connectors are secure and the red tab is depressed and locked in. If the connector appears to be loose or can be pulled apart then the factory headlight plug may be damaged. It is not an uncommon issue for the JK to have connector issues like this. You can read more about how to diagnose and correct this HERE
A: We have found that the Vector Grill in combination with certain aftermarket LED tail lamps can result in a "bulb out" indicator. The LED driver has additional resistance built in to prevent this so an additional resistor is not normally needed. If you are seeing this then only a small amount of resistance needs to be added. A small 10W/39Ω Resistor will easily correct this problem.
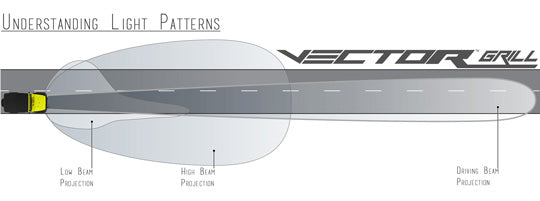
A: The low beam lights use a combination of 6 modules to create your normal driving lights. The driving beam portion sends light way down the road to spot obstructions and give you long range of visibility. The low beam creates a wide field of vision for the driver without blinding oncoming traffic. The high beam only has 2 lights so naturally the high beam will not appear as bright even though it is a very high output 1,600 Lumens.